Thursday, May 8, 2014

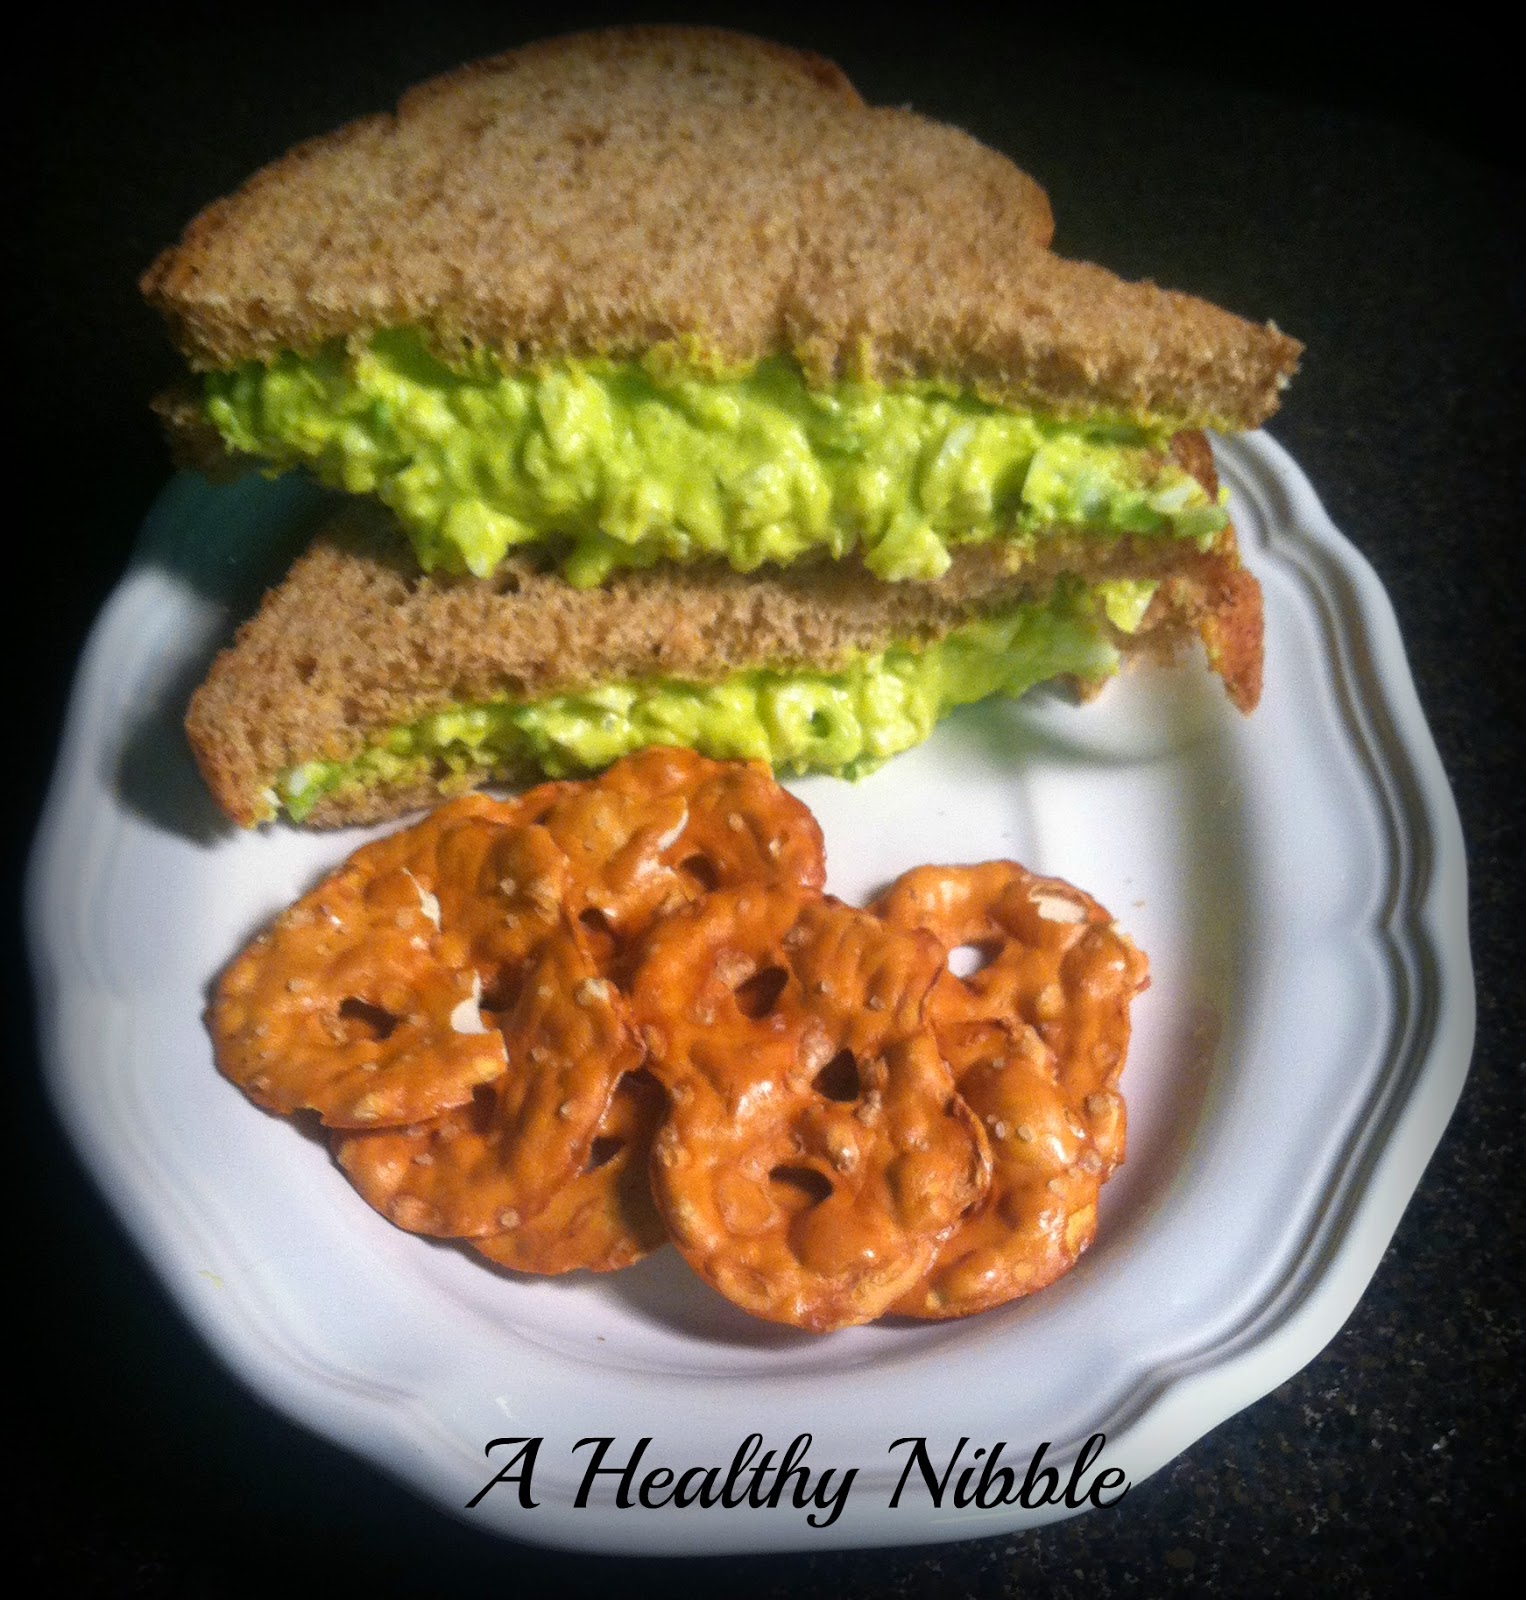
Green Egg Sandwich

This may not be the prettiest of sandwiches, but you would never know it by the taste.  Did you grow up eating egg salad sandwiches?  This is basically egg salad with avocado mixed in.

It's loaded with protein and heart healthy fat.  

I didn't measure any of the ingredients, just eyed them.  I will give a close estimation and you can take it from there. ;)

Green Egg Sandwich

2 hard boiled eggs
1/4 of an avocado
1 green onion, chopped
1/2 tsp. mustard
2 to 3 Tbsp. mayo or Vegenaise*
1/2 tsp. turmeric
1/8 to 1/4 tsp. salt
1/8 tsp. pepper

Mash eggs and avocado with a fork.  Stir in remaining ingredients.  Cover and chill until cold.  Serve on bread, crackers or veggie dippers.

*What I like about Vegenaise is... it contains no high fructose corn syrup, hydrogenated oils or trans fat.

Saturday, May 3, 2014

Raw Cashew Shake

This has got to be one of my favorite shakes!  I love the frothy texture and it has a wonderful spicy flavor.  To me it is reminiscent of eggnog.  Now that I say that I must experiment in making a raw cashew eggnog shake...yum!

If you search out the ingredients in this shake you will see what a powerhouse of nutrition you are getting.

Raw Cashew Shake

1 C. Milk of choice
1/2 C. soaked raw cashews *see note at bottom
1 banana
1/4 tsp. cinnamon
1/4 tsp. turmeric
ice

Mix all ingredients in a high powered blender.  Add enough ice to achieve desired consistency.

* Soaking cashews - place cashews in a bowl and cover with water.  Let stand at room temperature for at least 4 hours and up to 7 hours.  Drain any remaining water and rinse.  Measure out and add to recipe.  Store any leftover cashews in the fridge.


Friday, May 2, 2014

Continuing the Journey and A Super Healthy & Filling Salad

These past few months life has been super busy, making it hard to find time to blog.  I'm still on my journey to better health...a nibble at a time. ;)  I must admit it was hard to keep at it this winter.  It was such a long, cold and dreary one and there were times that all I cared about was eating for pure enjoyment! :)  Not that eating healthy is not enjoyable. ;)  I will say I did better than I have in winters past...just not as good as I feel I should have.  Now that the sun is shinning I feel energized and motivated to do better.  I want to do everything I can to be healthy for myself and my family. 

Aside from eating healthy I want to start monitoring my daily steps.  I'm not one that loves to exercise, but I love to take walks and breath in the fresh air and sunshine.  They saying walking is just as good for your health as other forms of exercise and that you should shoot for 10,000 steps a day.  Since I have no idea if I'm even close to that I decided to order a fitbit zip to track it for me.  I've wanted one for a while, but couldn't decide if I should get the zip or the fitbit one?  After reading I decided to get the zip.  Besides, the one doesn't come in all the fun colors as the zip. ;)  I also ordered one for my daughter Kara ...so we can track our way to better health together!  If you're interested in learning more about the fitbit you can read about it Here.  If it's as good as they say... I think I will love it.  It monitors your number of steps, distance and calories burned.  It will be interesting to see how I rate on a typical day.  It might be scary! :/  

Now on to a super salad!  I love salads because you can customize with what you like and have on hand.  Salads can be so filling, nutritious, and delicious.  Funny thing is...I used to think of salads as rabbit food... not filling, that they should be fat free or at least low fat.  If you were eating salads for health or weight that's just how they had to be...WRONG!  I'm so glad to learn that that way of thinking is completely wrong.  Now when I think of a salad I think of filling and loaded with healthy fat.  We need fat to keep us going and feeling full.  No more rabbit food! ;)

For this salad I added mixed greens including baby spinach, avocado, tomato, blueberries, raw pumpkin and raw sunflower seeds, black pepper, a sprinkling of turmeric, a squeeze of lemon and a good drizzle of macadamia nut oil.  Normally, I would add a boiled egg, but I didn't have one ready to go.  
  The avocado, seeds and oil are loaded with healthy fats to keep me feeling full.  Blueberries are a good source of antioxidants.  Turmeric is a super spice with many health benefits.  I try to incorporate it as much as I can.  I rate macadamia nut oil high on my list of healthy oils.  Coconut is one of my favorite.  However, unlike coconut oil, macadamia nut oil does not solidify when cool so it's perfect to drizzle on your salad.  

I really need to work on some healthy salad dressing recipes.  My problem with most bottled dressing at the store is... all the unhealthy ingredients added to them.  It's the unhealthy oils such as canola and the high fructose corn syrup, etc.  If you have a favorite healthy salad dressing recipe...please share. :)

I hope to find some extra time to blog and will try to get some recipes posted, soon!  
    

Wednesday, January 8, 2014

Flourless Blueberry Chia Pancakes

Who would have though you could create a pancake by combining a banana and an egg???  I don't know who came up with the idea, but I'm glad they did. :)  The fun part is deciding what "yummies" you want to add in.
To begin you need 1 very ripe banana and 1 whole egg.  Whip the egg and mash the banana with a fork and stir together.

I added 1 Tbsp. chia seeds and a scant 1/8 tsp. cinnamon.  Chia seeds are a great source of nutrition.  They are packed with protein, fiber and Omega-3's.

I also added about 3/4 C. fresh blueberries.  I've made mixed berry ones by adding diced strawberries in with the blueberries.  They were really good, too.

Heat a small amount of oil on a griddle and divide the batter into 3 small pancakes.  If you opt for 2 larger ones, know that it is hard to flip them without them falling apart.  I also flatten the batter out just a little with my fork.  If they are too thick the centers won't set before the outside gets too brown.  Cook on low to medium low until center is soft set then flip and cook a couple more minutes until that side is browned and center is to your liking.


 I like to eat them plain, but you can top with whatever you like.   This is a great and healthy way to use up those over ripe bananas and it's much quicker than making banana bread.  There are many other things you can add to come up with your favorite variation...coconut, flax or hemp seed, different spices, etc.  For a sweet snack you could toss in some dark chocolate chips...yum! 

Thursday, January 2, 2014

Philly Cheese Chicken Sub & Kitchen Update ...

If you are like me you are wondering where the past few months went?!?!  I can't believe Christmas has come and gone and it's now 2014!  With life being so hectic blogging was put on the back burner for a bit, BUT I did try to snap a few pics along the way for future posts. :)  This is one of them and it's one of my favorites.
Loaded with tender chicken, veggies and melted cheese...Yum!  If you are vegetarian simply leave out the chicken for a yummy veggie sub.
Heat a small amount of oil in skillet.  Add veggies... I added orange bell pepper strips, red onion and minced garlic.  Normally I add sliced mushrooms, but I was out.  Saute until crisp tender.
To season I add a good sprinkling of McCormick's Salad Supreme seasoning.  It's a great blend of Romano cheese, sesame and poppy seeds and spices.

Add cooked boneless skinless chicken breast chunks.  (You can cook your own or use precooked frozen ones if you're in a hurry.  When cooking my own I do add a little salt and garlic powder to the cooking water).  Cook until chicken is lightly browned and veggies are tender to your liking.
In an oven proof dish add filling to your favorite sandwich bun and top with additional fresh veggies such as spinach and tomatoes.  Note...I like to toast my bun before adding veggies.  I simply add a drizzle of oil to a small skillet and brown bun face down.  
Top with sliced Swiss cheese.  I added two slices, but one would have been sufficient. ;)
Place under broiler for 4 or 5 minutes until cheese is melted.  Watch closely as it doesn't take long.  I don't add any other dressing to mine, but you could top with a drizzle of salad dressing such as ranch, if you like.

In case you are wondering... we have completed the majority of our kitchen project.  The only big thing left to do is a new florescent light, but we've not had time to go pick one out.  I also have a small bit of touch up painting to do.  Then the fun part...decorating.  Since I love to craft I really enjoy making my own decor.  Here's what I've done so far.  I will get overall pictures taken soon and post with details.

I made this fun picture to hang above my refrigerator.  The space is far enough back from one's eye that it needed one big, bold piece of decor rather than multiple small items.  The frame was an old brown frame that I found at the thrift store.  I gave it a nice coat of goldenrod yellow paint, aged it with some gel stain and instantly fell in love with it! :)  I am terrible about taking before pics or you could see the transformation. :(  Then I added burlap for the backing and the "Eat" was ready made from Hobby Lobby. 

This little window turned message center is my pride and joy! ;)  This little wall and window acts as a divider between the family room and kitchen.  Previously it held a glass window that allowed light to pass through and a view of the patio door.  I didn't want to close it in, but the glass had to go.  It was very dated with some ugly gold butterflies across the top and bottom.  In no way did it match the kitchen anymore.  Without much thought we decided to take... OK...knock it out! ;)  This was on a whim and I didn't even think to grab the camera! :( 

 Now...I had no idea what I was going to do with the space, but once the glass came out I knew I had to think of something...Yikes!  It was way too open and out of place!  Then it hit me...I had a roll of old chicken wire just waiting to be repurposed.  I thought of those cute picture frames I'd seen on Pinterest.  You know the ones with chicken wire attached to the back of the frame and those cute little clothes pins for pictures and notes?  I had the perfect spot to create my own little chicken wire message center and I was so excited! :)
The rooster hanging at the top of the window is the perfect accent.  I would like to find a little sign or saying to hang from him and maybe top it with a burlap bow.  I also spray painted the chicken wire a rusty red color.  Since we live on a farm the chicken wire message center is the perfect touch to my kitchen.  It is much cuter in person.
I found this little metal planter turned note holder at Walmart.  A quick coat of spray paint, a note pad and pen and it's perfect for this space.

Last, but not least... the inspiration for my color palette is this kitchen towel from WM.  I love the goldenrod yellow, rusty red and aqua, accented with chocolate brown.  I've had roosters in my kitchen for a long time, but they were more realistic.  I am loving the whimsical kind.  Such a fun change.

Monday, November 18, 2013

Quick & Easy Sweet Potato Fries

Yesterday I was in need of a late afternoon snack.  I wanted something more substantial than a cup of yogurt and fruit or a handful of nuts.  I wanted something warm and comforting, so I whipped up a pan of my sweet potato fries.

Here's my trick for making them quick and easy... I wash and pierce them with a fork and cook them in the microwave until almost done.  Be careful not to cook too long or they will fall apart when you cut into fries.  For one small potato I bake about 3 or 4 minutes turning potato over half way through.  Times will vary depending on your microwave.  Not only does using the microwave speed up cooking time, it's also much easier to cut an almost done sweet potato rather than a raw one.  When cool enough to handle cut in to fries.  Then I prefer to fry mine in a skillet, but you could brush with oil and bake them.  I fry in a heaping tablespoon of coconut oil to keep them healthy.  Brown them on all sides until completely tender (if not already) on the inside and crispy on the outside.

I prefer to eat them plain, but you sure could spice them up with your favorite seasonings.  Make them savory, sweet or sweet & spicy.


Sunday, November 17, 2013

Busy In The Kitchen... Rustoleum Cabinet and Counter Transformations with Pictures

If you follow me on Facebook you already know things have been crazy at my house for the past two weeks.  Have you ever started out with a small home improvement project only to find yourself in the middle of something way bigger than planned?  That's what happened to me.  My oven went out and in the process of getting a new range it proceeded into a new floor, but you can't put in a floor without painting the walls.  Then we looked at our way outdated cabinets and counters and one thing led to another until our kitchen looked like it had been through a tornado!  Needless to say it meant eating out way too much and no fun in the kitchen!  I am happy to say it is coming together quite nicely.  We are still working on it, but at least I can cook again. Yay!

One of the first things I had to make was my Vegetarian Taco Burgers.  They are so Yummy! ;)  The recipe can be found HERE.

My 2nd big craving is a fruit smoothie.  Will have one to post soon!

Here is a glimpse of the before and after.  We are also doing the laundry room that is connected to the kitchen.  I hope to have everything completed by Thanksgiving...I hope. :)
My very outdated and blah kitchen.  I hate even posting this photo, lol.  You can't see the backsplash thanks to the counter clutter, but it is a very outdated hunter green ceramic tile.  I have been over hunter green for many years. :/  Replacing the cabinets and counters was not in the budget so we opted to do the Rustoleum Cabinet and Counter Transformations.  We chose the cabinet kit in frost and the counter kit in java stone.  The results amazed us!  You can learn more about the transformation kits HERE.   

 Hard to believe the transformation.  Same cabinets and counters...just refinished.  Gives such a fresh new look.  Note the missing drawer pulls.  We had to order them and are still waiting.   We have more trim work and touch up painting to do.  My range hood is a little larger than standard so we had to order it and it won't be in until Dec.  Once it's all complete I will post more photos.  If you are looking for an inexpensive way to update the look of your kitchen...I highly recommend the Rustoleum Transformation Kits.  No, this is not a paid endorsement.  Just my opinion.  With that being said I must add...it does take some elbow grease, time and patience, but it is well worth it!